Make sure students are attendees by default in Microsoft Teams meetings

Microsoft recently announced a change to meeting policies where a Teams Service admin can make sure users are attendees by default, rather than presenters.

This can be especially valuable in education, where students with the presenter role can misbehave by muting the teacher and removing others from the meeting entirely.

So let’s apply this change to an existing meeting policy using PowerShell.

First run the New-CsOnlineSession cmdlet and login using your admin credentials.

# Connect to Skype PowerShell
$CSSession = New-CsOnlineSession
Import-PSSession $CSSession -AllowClobber

# choose teacher policy from grid view and store to variable
$Policy = Get-CsTeamsMeetingPolicy | select Identity, Description | Out-GridView -PassThru

Then choose the appropriate meeting policy from the grid view and click OK.

policy teachers


We then need to update the policy to change the DesignatedPresenterRoleMode attribute to OrganizerOnlyUserOverride.

# change policy
Set-CsTeamsMeetingPolicy -Identity $Policy.Identity -DesignatedPresenterRoleMode OrganizerOnlyUserOverride

# verify results
Get-CsTeamsMeetingPolicy -Identity $Policy.Identity | select Identity, DesignatedPresenterRoleMode

The end result should be something like this.

tag teachers

You now need to wait… and wait some more… and in about 24 hours you should see that  students will be attendees by default in any new meetings organized by a teacher with the policy applied.

Teams for Education FAQ

Intro

This post was written to answer some of the most frequently asked questions about Microsoft Teams for Education. I plan to update with new questions and answers, as well as when changes to the service are applied, or new functionality hits general availability. If you have suggestions for improvements (like everyone else I do make mistakes) or questions and answers, please reach out.

Meetings

Q: How can I keep students from muting me or kicking each other out of the meeting?

A: Make sure students are attendees rather than presenters to gain more control over the meeting.

Support articleQuick tip video

Pro tip! A new option in Teams meeting policies now allow admins to control who can present in new Teams meetings by default.

Q: I would like to play a YouTube video during a Teams meeting, how can I make sure that students get the audio?

A: When sharing in Teams you should have the option to Include System Audio

Support articleQuick tip video

Q: I would love to see my students during remote learning, but how can I ensure the privacy of others who might show up in the camera view?

A: Participants can enable background effects when joining the meeting or during the meeting by pressing CTRL+Shift+P or clicking … (More options) followed by Show background effects.

Support articleQuick tip video

Q: How can I make sure students focus on my video during a call?

A: You can use the new Spotlight feature to spotlight yourself, a student or someone else in the meeting. Students can also right click the the video and select Pin.

Quick tip

Q: I need to keep track of what students were attending my remote class, where can I find that info?

A: If enabled the Meeting Attendance Report should be available in the meeting chat for the meeting organizer shortly after the meeting has ended.

Q: What can students do in order to get the teachers attention during a video call?

A: Students can use the raise hand feature.

Quick tip

Q: I can’t find the Calendar app in the app bar on the left, how can I enable it?

A: The Calendar app requires that the users mailbox is in Exchange Online or that IT has configured a supported hybrid setup with Exchange 2016 CU3 or later.

Chat & conversations

Q: How can I keep students from chatting amongst themselves?

A: IT can assign a messaging policy in order to disable chat for students. Keep in mind that this will also disable 1:1 chat between those students and their teachers. If you wish to block unsupervised chat between students but still allow for student:teacher chat, take a look at Supervised Chat. Teachers can also mute students from channel conversations in a class team.

Docs articleQuick tip

Q: How can I create a quiz or a poll for students in Teams?

A: One option is to open the Posts tab in a channel in the class team, and choose Forms from the messaging extensions below the “start new conversation” area. In a private meeting you can also add the Forms app to the meeting for a more interactive and engaging experience.

Support articleQuick tip

Files

Q: How can I sync the files area with my computer?

A: You can sync files using OneDrive by opening the files tab and choosing Sync.

Blog post

Teams and channels

Q: I’m in many teams, how do I rearrange the list in order to get those that are most important to me on top?

A: Click and drag any team to reorder the teams list. You can also pin individual channels by clicking More options … next to the channel and selecting Pin.

Support article

Take control of your Microsoft Teams environment part 7

In part 6 we added an approval flow right within Teams, but in this post it’s time to cover what happens when an approval is granted. Let’s provision a team!

Graph3

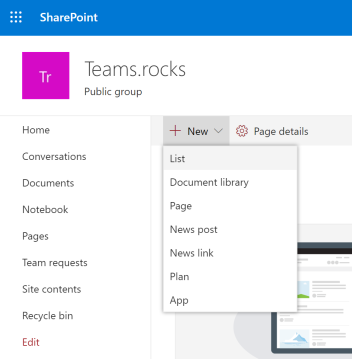
There are many ways to provision a new team, you could obviously do it manually from within the Teams client, an admin could do it using the Teams Admin Center, there’s the New-Team PowerShell cmdlet, and more.

Since we’re creating an automated process, there are other tools more suited for the task at hand. I know there are great examples out there using Azure Automation, however, since we’re starting to get familiar with Microsoft Flow, let’s see if we can’t use that.

From before we know there are built-in actions to post messages in Teams, post adaptive cards, we can get messages, and even list or create channels. There is however, at the time of writing, no action to create a new team.

Instead we use an HTTP action against Microsoft Graph.

Microsoft Graph is the gateway to data and intelligence in Microsoft 365, and provides a unified programmability model that you can use to access data across Office 365, the Enterprise Mobility + Security suite and more.

In order to connect to Graph we need to authenticate, which is done using an Azure AD application with Group.ReadWrite.All permissions (please see Lee Ford’s blog post on Using Flow with Graph API for instructions on how to create the application).

You might remember that we initialized a few variables back in part 5? Well, we’re finally going to need them. We’ll need to enter the client secret and the app id in the appropriate variables…
variables

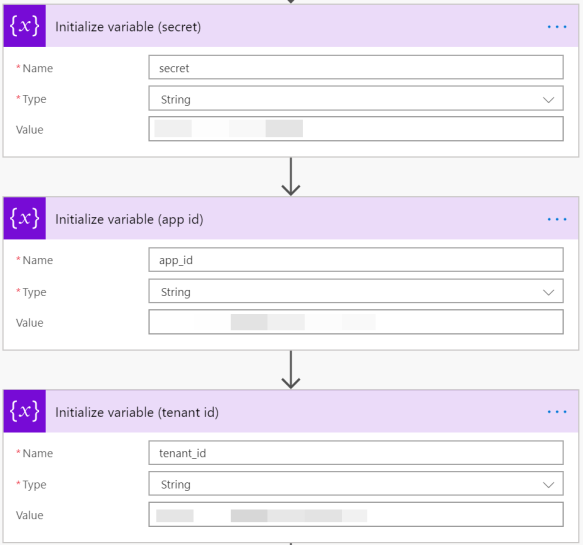
…as well as the tenant id, which is easily found over at whatismytenantid.com.

switch.png

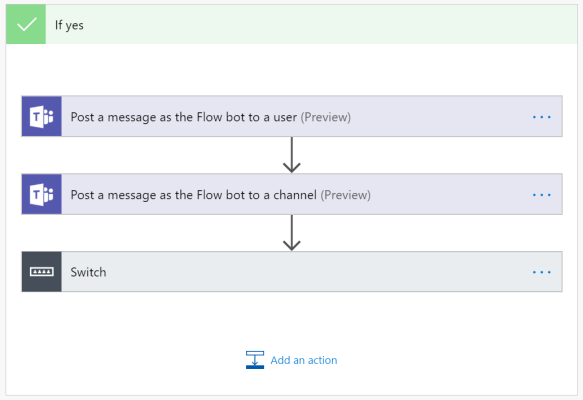
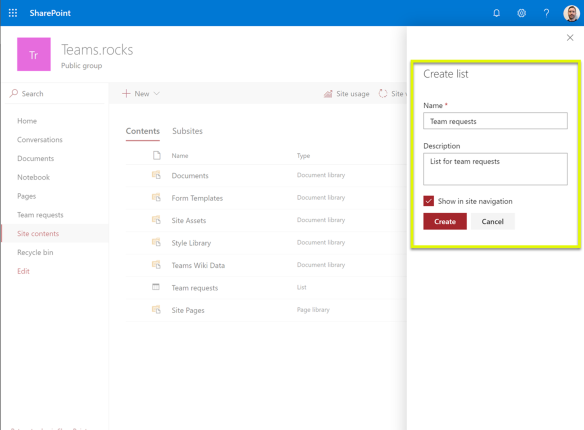
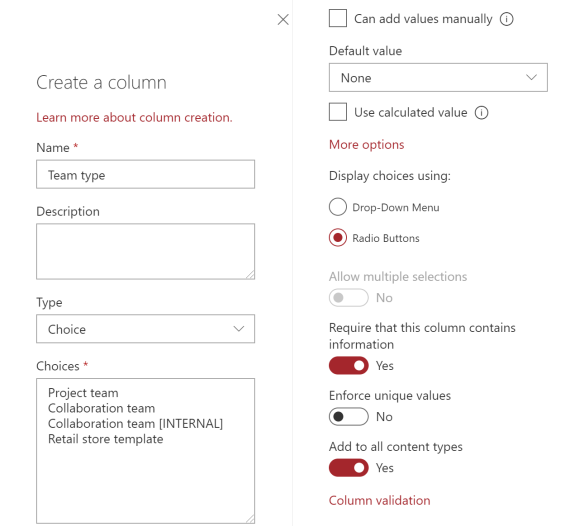
You might remember from part 2 that we had four options for team type. To apply different logic based on the input from the request form, we’ll use a Switch action.

Case project team.png

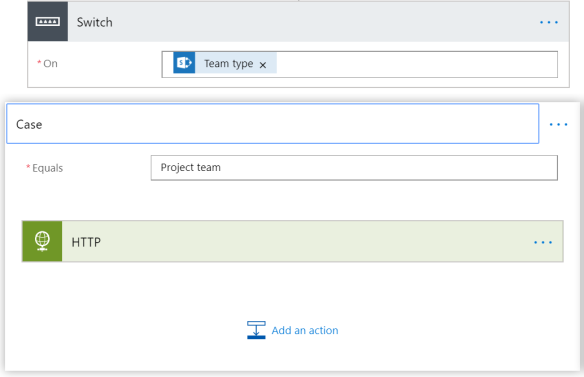
We’ll switch on Team type, and for this example the one we called Project team. So if the team type equals ‘Project team, the HTTP action will trigger.

HTTP Project team.png

We’ll need to authenticate with Graph, so we’ll choose Active Directory OAuth in the Authentication box, then https://login.microsoft.com as the Authority. We’ll also finally make use of the variables mentioned above, we’ll specify that the Audience is https://graph.microsoft.com and then finally set the Credential Type to Secret.

There are three ways to provision a new team using Graph, we can Teamify an existing Group, we can clone an existing team or we can use a template (beta). For our project team we’ll use clone.

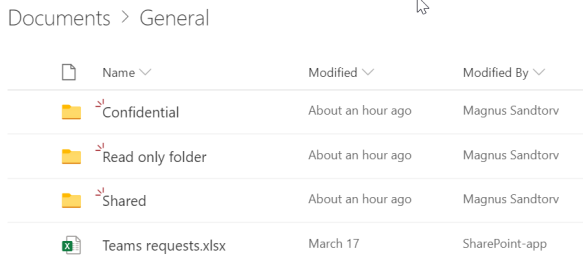
When you clone a team in the Teams client or using Graph, you have the option to clone apps, tabs, channels, settings and/or members.

In order to clone a team we need a team to use as source. Just create a new team using the Teams client, then add tabs, channels etc. to fit your purpose. When you’re happy with the result, fetch the GroupId to specify in the URI. The URI should be in the following format: https://graph.microsoft.com/v1.0/teams/{GroupId}/clone

We’ll also need some JSON in the body, to specify display name, description, what parts to clone and the visibility.

At the time of writing, the mailNickname attribute was ignored.

New project team.png

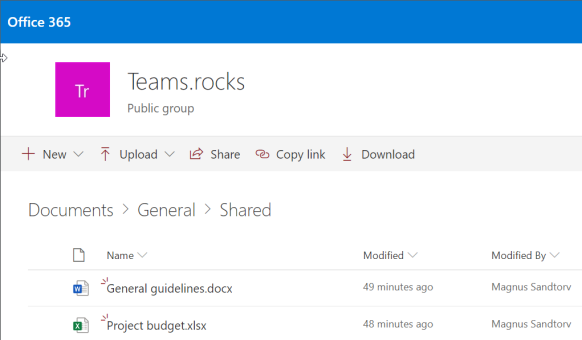
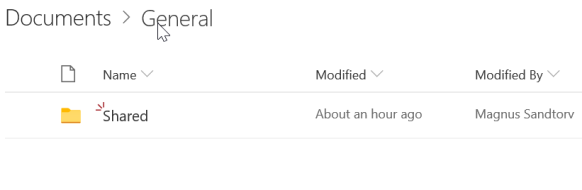
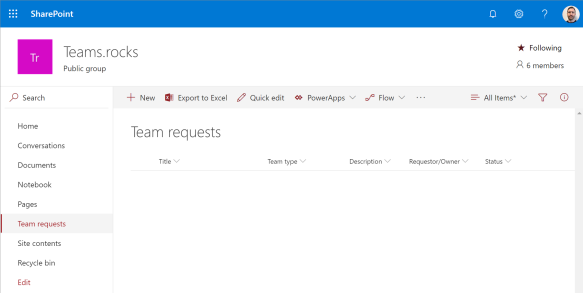
That’s it, as soon as the request is approved, a new team is provisioned, copied of the source team created earlier. In this example you can see there’s a channel called Example channel already present in the team.

One thing to note is that when we clone a team, the user account performing the clone, is actually the one added as an owner. In this scenario that would be a service account, not the person actually requesting the team. Let’s see in a later blog post if we can’t get that sorted out.

A project team would most likely also benefit from a predefined folder structure, don’t you agree? Well it looks like we still have plenty more to cover, so stay tuned for more.

Take control of your Microsoft Teams environment part 6

Last time we added an approval flow, where managers could accept or decline the request for a new team. But that was based on email, which seems a bit old fashioned, right? What if we could to all this in Teams? Let’s give it a try!

approval header.jpg

OK, I know I promised you last time that it was time to cover what happens when a request was approved. Please bear with me, I’ll cover that in the next part for sure.

First, we’ll need to replace the Start an approval action, with an action called Create an approval.

create an approval 2.png

We’ll set the Approval type to Approve/Reject – First to respond, add a title and assign the approval to the user’s manager by picking the Mail object from Get manager (V2).

Requestor is set to the user, by specifying the Mail object from Get user profile (V2). Finally we disable email notifications by setting Enable notifications to No.

Next we’ll pull the adaptive card from the above action, into a new action called Post your own adaptive card as the Flow bot to a user (Preview).

post your own adaptive card.png

The recipient needs to be the manager, so we’ll pull the Mail object from the Get manager (V2) action (above). The Message needs to be the Adaptive Card created by the Create an approval action.

We also need to catch the response, which we’ll do with an action called Wait for an approval, where we specify the Approval ID.

wait for approval.png

In the Condition we’ll need to change from Response to Outcome.

Condition.png

And we’ll need to update the If yes and If no to post a message in Teams instead of sending an email.

yes - post a message.png

Note that the Mail object is from Get user profile (V2) and the Display Name in the message is from Get manager (V2).

Finally, before we move on to the team creation logic in the next part, we’ll also want to post a message into an approval channel where everyone can see what teams have been approved.

For these things to work you’ll need to add the flow bot to your team.

We’ll accomplish that using an action called Post a message as the Flow bot to a channel (Preview).

post to channel.png

We’ll select the appropriate team and channel, then pull the title of the team as well as the requestor from the SharePoint list, and finally add the Display Name from the Get manager (V2) action.

This is what it looks like with the latest changes:

latest overview.jpg

For a full video tutorial on how to add approvals in Teams using adaptive cards, please visit  and Daniel Laskewitz‘ video on the subject at the Microsoft Flow blog (source).

Stay tuned for part 7, where we most definitely will have a look at what happens when the request is approved 🙂

Take control of your Microsoft Teams environment part 5

In part 4, we integrated our request form with the SharePoint list, using Microsoft Flow. In this post I’ll cover how to add an approval flow.

approvals.png

We’ll start up by navigating to flow.microsoft.com, and search for something like “SharePoint list”. We’re looking for a template called Start approval when a new item is added.

Since the SharePoint list is connected to the request form, this will allow us to start an approval process as soon as someone requests a team using the form.

approval template.png

The flow will need to connect to a few services, preferably using a licensed service account.

connect to services.png

The template looks quite advanced, but don’t worry, we’ll go through it step by step.

original template.png

Let’s start out by specifying the SharePoint list we created in part 3.

when a new item is created.png

Next up we’ll need customize the template by adding a few variables and gather some information.

Let’s first click the + sign below the first action to add a new step…

new step 2.png

…choose add an action, search for variable, and then choose Initialize variable from the list.

initialize variables.png

Repeat the above step until you have three variables, the type should be String, other than that we’ll leave these for later.

We’ll also add two new actions, one called Get user profile (V2) and one called Get manager (V2).


variables and more.png

We’ll choose dynamic content from the SharePoint list, specifically the email address of the user who filled out the request form, which we stored in the Requestor/Owner Email column.

Next up we’ll customize the Start an approval action by adding the Mail attribute gathered from the Get manager (V2) action. We’ll also in Details specify the display name of the requester, previously stored in the Requestor/Owner DisplayName column of the SharePoint list.

start approval action.png

At this point in the flow, an email will be sent to the users manager.

If you prefer that ie. IT handle these requests, just skip the Get manager (V2) action and add an email address manually.

please review.png

You can see above that the manager has the option to either approve or reject, right from within the email.

Going back to flow, a condition action is used to allow for a different result based on whether the request is approved or not.

yes no.png

There’s no need to change anything in the condition action, so let’s move on to what will happen if  the request is rejected.

rejected.png

Since we don’t want the rejection mail going to a service account, we’ll pull dynamic content from the Requestor/Owner Email column in the SharePoint list.

inform rejection.png

You might remember that we created a column called Status in the SharePoint list back in part 3? If you would like the list to reflect the current status of the request, add the SharePoint action called Update item.

update item.png

Specify the appropriate site and list, and the item will pull the available columns from the list. Since this request was rejected, we’ll update the status with that.

update item.png

That’s it for now, an email is sent to the requester, specifying that the request was rejected, and the SharePoint list item updated with the current status.

full rejection flow

Rejection flow illustration

Next up we’ll cover the fun part, which is whatever happens when the request is approved!

Share a folder in Teams

In this short blog post I’ll demo the experience when sharing a folder from within Microsoft Teams.

teams-sharing.png

Let’s say you’re working on a project, and there are external parties like vendors or subcontractors involved, who needs to review or collaborate on some project documents.

You might for some reason not want to invite them as a guest to the team, so let’s instead just share the folder with the relevant documents.

First open the Files tab, navigate to the location of the folder you’d like to share and click Open in SharePoint.

files.png

Mark the appropriate folder and click Share.share.png

In the sharing dialogue, click to change who should be able to view or edit.

sharing dialogue.png

I’ll choose specific people, which ensures that the recipient will need to identify themselves by logging on.

sharing specific people.png

Notice that Anyone with the link is grayed out, this is as a result of default settings on the underlying SharePoint document library, but can easily be changed, which is something I covered here.

When you click Apply you’ll be able to enter the email of the recipient, and optionally add a short message.

Send link.png

Click Send and you’ll get a notification confirming the link is sent.

link sent.png

The recipient will receive an email notification and will start the process of gaining access by clicking Open.

open shared folder dialogue.png

To verify the secure link, click Send Code.

send code.png

The recipient will receive an email with a code that is valid for 15 minutes.

code in email.png

Copy the code, navigate back to the link sharing validation, paste it and click Verify.

verify code.png

Click Next…

next.png

…and you will be taken to the shared folder in SharePoint.

files in teams.rocks tenant.png

Let’s finally verify that we can only see the appropriate folder by clicking General.

general.png

There you go, only one available folder…

only shared folder.png

…as opposed to what the actual team members will see.

general channel view.png


Take control of your Microsoft Teams environment part 4

In part three we covered how to create a SharePoint list, with the goal of storing the input from our Teams request form. In this post we’ll conclude this part of the process, by using Microsoft Flow to integrate the request form with the SharePoint list.

Teams_forms_flow_sp

We’ve now got a request form, and a SharePoint list to store the responses. Let’s see if we can’t use Flow to tie the two together.

You’ll find Flow in the Office portal or by navigating to flow.microsoft.com. On the landing page you’ll see a search bar, and since we’re looking to connect Forms with SharePoint we’ll search for that.

reckord forms responses in SharePoint

The first hit is Record form responses in SharePoint, which is exactly what we’re after, so let’s choose that.

flow template

We’ll get some more information about this template and what it needs to connect to, as well as a way to specify what account should be used to connect to these services.

Pro tip! It’s generally a good idea to use a licensed service account in automated processes like this.

When we click Continue we’ll be presented with the standard template. There’s a few options we’re required to enter, like the source form, as well as the destination list.

flow-new.png

When the list is specified it’ll pull the columns, enabling us to dynamically match answers from the request form with the appropriate column in the list.

flow-SP-create_item.png

As mentioned we’ll use the Title column for Team name, and we’ll match both Team type and Team description with the appropriate columns.

Next we’ll add a descriptive text string to Status, informing users that the team request is pending.

The Requester/Owner column is actually populated with something not covered in the standard template. We’ll need to add an action called Get user profile (V2) to fetch user profile information from Office 365.

user profile.png

Let’s click the + icon above the SharePoint create item action, search for user profile, and add the Get user profile (V2) action.


flow get user v2.png

We’ll add the email address of the requester in the Get user profile (V2) action using Responders’ Email from the form, and finally add the User Principal Name item from the former as shown above.

The above configuration requires that your User Principal Name (UPN) matches your e-mail.

Finally let’s save the flow and request a team to confirm that the SharePoint list is updated.

new request added to SP list.gif

That’s it for today’s post, but make sure to follow my blog, to be among the first to learn how to automate team creation based on this request form, add manager approval and more.

If you have any questions or feedback, don’t hesitate to leave them in the comments below.

Take control of your Microsoft Teams environment part 3

In part two of this series we created a form where users could request a new team, and in this post I’ll show you how to create a SharePoint list to store information from the Teams requests.

Teams-SP-list.png

Taking input using a request form is great, but we need to reuse this information later on in this process, and it just so happens that SharePoint lists are great for this purpose!

First navigate to SharePoint, I chose to use the site belonging to an org-wide team, but feel free to use your preferred site.

create list


Give your new list a new name and description, then hit Create.

Create list2

The new list will only have a Title column, so we’ll need to add a few more.

You might remember from the request form that we had three questions, one was team type, then team name, and finally team description. Let’s use Title for team name and add one for team type and team description.

team type column

For team type (above) we need to use Choice as column type, and enter a few options in the Choices box.

I also chose radio buttons, but a drop-down menu would also work. Team type is essential later on, so we make sure it’s required that this column contains information.


For description (below) we’ll keep the standard type, which is Single line of text.

description column.png

It’s entirely up to you whether or not team description should be mandatory, but keep in mind that it would give managers more insights into the purpose of the team upon approval.

List columns.png

We’re also going to need some info about the requester later on, so we’ll add a column using the type Person. This allows us to store the entire person object, including the manager attribute.

Finally we’ll add a column called Status, where we can store information about the overall status of the approval process.

This concludes the process of creating a list in SharePoint, and in part four we will use Microsoft Flow to help us store any form responses in this list.

Take control of your Microsoft Teams environment part 2

In part one of this series we covered how to control who can create teams, by limiting group creation. In this post we’ll create a form in Microsoft Forms, where end users can request a new team.Teams_and_Forms

While it’s sometimes important to control who’s able to create teams, in order to avoid teams sprawl, it’s equally important not to stand in the way of end users productivity.

So let’s jump right in and create a request form.

New_Form

We do that by first choosing Forms in the Office waffle, or browse to forms.microsoft.com, and then hit the New Form button.

Let’s add a theme and give the request form a title.

Request form2

We’ll use the description to inform the user that the request will be sent to their manager for approval.

Next we’ll add a Choice called Team type, and mark it as required.

Request form3

Let’s also add a few options, which we’ll make use of at a later time.

Last but not least, let’s add a required text field for Team name, and a text field for Description

Request form4

…before me make our new form easily available in an Org-wide team.

Teams_requests_tab

That’s it for now, but we’ve got lots more to cover. In part three we’ll create a SharePoint list to store this input, before we use Microsoft Flow to tie the two together.

Take control of your Microsoft Teams environment part 1

So, you introduced Microsoft Teams in your organization without a plan? Or perhaps you’re still planning your rollout, and want to learn how to take control? Well, you’ve come to the right place.

In a few blog posts my goal is to help you take control of your Teams environment, and first up is limiting who’s allowed to create teams.

teams_whit_lock

One of the first things we need to decide, before giving users access to Teams, is whether or not they should be allowed to create teams. Microsoft generally recommend that they should, which is why they are allowed using the default settings, and in many cases that makes perfect sense.

Let’s say you’re a small law firm, maybe ten lawyers and a couple of secretaries. You would most likely choose to allow anyone to provision new teams, not to get in the way of their productivity.

bad_students

But what if you’re a municipality, with a mix of employees in healthcare, education etc., as well as thousands of young students. You would most likely want to get in front of that, right, to make sure that new teams are appropriate, and to maintain in control?

Well, we lock down the provisioning of new teams by limiting group creation.

Keep in mind that disabling group creation also affect other services relying on Groups, like Planner, StaffHub etc.

To limit group creation we first need to create a security group, and then add users who should still be allowed to create groups, and thereby teams.

All members of this security group must be licensed with Azure AD Premium or Azure AD Basic EDU. Microsoft currently does not enforce this, so it will work perfectly fine without assigning such licenses, but you need to acquire them to be properly licensed.

Allowedtocreategroups

The next step is to connect to Azure AD using the Azure AD Preview PowerShell module, and run the following script.

$GroupName = "Allowedtocreategroups"
$AllowGroupCreation = "False"

Connect-AzureAD # Need to be using the Azure AD Preview module

$settingsObjectID = (Get-AzureADDirectorySetting | Where-object -Property Displayname -Value "Group.Unified" -EQ).id

if(!$settingsObjectID)
{
    $template = Get-AzureADDirectorySettingTemplate | Where-object {$_.displayname -eq "group.unified"}
    $settingsCopy = $template.CreateDirectorySetting()
    New-AzureADDirectorySetting -DirectorySetting $settingsCopy
    $settingsObjectID = (Get-AzureADDirectorySetting | Where-object -Property Displayname -Value "Group.Unified" -EQ).id
}

$settingsCopy = Get-AzureADDirectorySetting -Id $settingsObjectID
$settingsCopy["EnableGroupCreation"] = $AllowGroupCreation

if($GroupName)
{
    $settingsCopy["GroupCreationAllowedGroupId"] = (Get-AzureADGroup -SearchString $GroupName).objectid
}

Set-AzureADDirectorySetting -Id $settingsObjectID -DirectorySetting $settingsCopy

(Get-AzureADDirectorySetting -Id $settingsObjectID).Values


We’ve now effectively disabled teams creation for all users that are not a member of the security group, causing the Create a team option to disappear from the Join or create a team page.

CreateTeam

Some admin roles will still be able to create groups and teams, like the Global Admin, Teams Service Admin etc.

For more information about limiting group creation please have a look at the official documentation, which was also my source for this blog post.

Also, stay tuned for more on the topic of controlling your Teams environment, next up is how to create a request form with manager approval!